INSTALLING NOD32
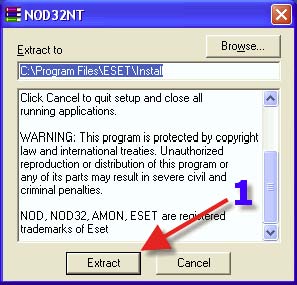
Double clicking on the NOD32 executable file that has been downloaded begins the setup process. 1. Click “Extract”.
1. It is recommended to initiate a “Typical” install unless one has previous experience with NOD32 and is comfortable navigating through the program's settings. 2. Click “Next”.
1. Click on the Radio Button that reads “I agree”. 2. Click “Next”.

Please LEAVE Server as <Choose automatically> for the following reasons: * If a particular server is down, NOD32 will NOT be able to roll on to the next server.
* Experience shows that one will have fewer or no problems with updating using this setting.
* Let Eset do their job and balance loads on the servers. 1. Place in the Username (UN) that the CSA email has provided. 2. Place in the Password (PW) that the CSA email has provided. ONLY a UN and PW provided by CSA will work. These are not personalizable entries created. 3. Click “Next”.
1. Leave this Radio Button as is, UNLESS one uses a modem that dials onto the internet. 2. Click “Next”.
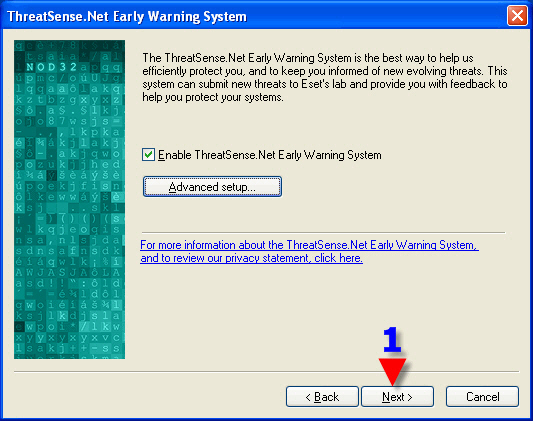
1. NOD32 has been purchased for its ability to protect a computer. Help Eset to continue in its efforts by leaving “Enable ThreatSense.NET Early Warning System” checked.
2. Click here to see what information is sent to Eset.
1. Make a choice, we hope that one participates and chooses the middle or lower option. The information sent is anonymous. One may want to add an email address here in case Eset would like to have further contact regarding what is being sent.
2. Click on OK

1. Click on “Next”.
1. Leave this checked so the resident scanner (AMON) will start automatically upon booting one’s system.
2. Click “Next”
1. Click “Next”.
1. Click this Radio Button to restart the system. 2. Click “Finish” to complete the installation.
Welcome to NOD32, this is the NOD32 splash screen that first appears upon bootup of your system (if this option is turned on).
The “NOD32 Control Centre” is located in the “System Tray”, at the bottom right hand corner of the desktop. Double Click on this icon.
1. Click on “AMON” 2. Click on “Setup”
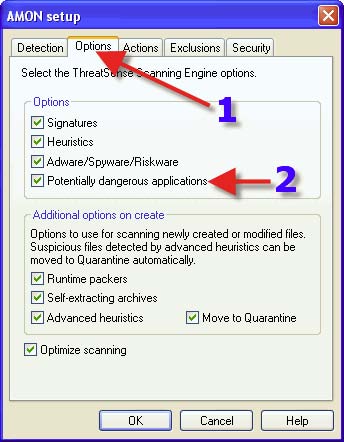
1. Click on the “Options” tab. 2. Place a check in “Potentially dangerous applications”. WARNING: enabling this option may result in deletion of Remote Adminstrative programs such as those used by network administrators.
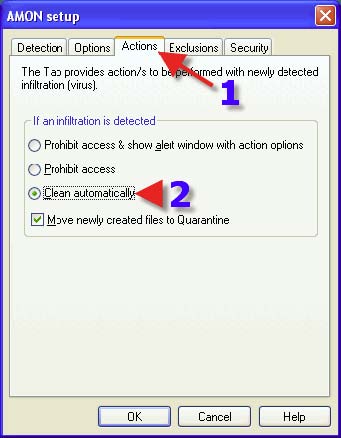
1. Click on the “Actions” tab. 2. Choose a Radio Button that suits one’s needs. If one is new to NOD32 or a novice with a computer, one may want to have NOD32 “Clean automatically”, however, should AMON find a “False Positive” it will delete the file even if it proves to be non-viral at a later date. Though this remains a possibility, it is unlikely for the average user.
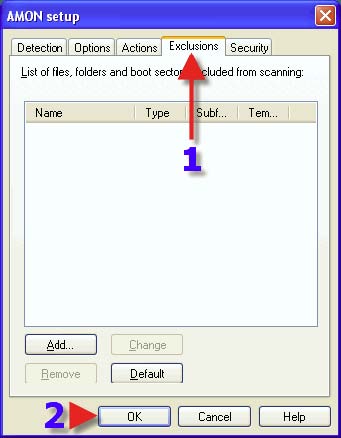
If one is having issues with a particular file or directory, one may be directed here in order to exclude such a file or directory. 1. Click “OK”
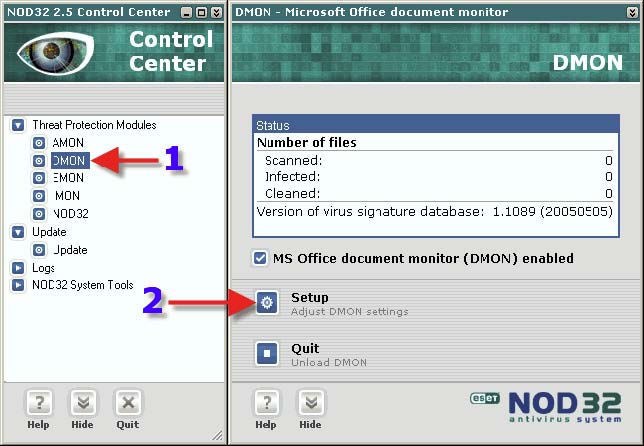
1. Click on “DMON”. 2. Click on “Setup”.
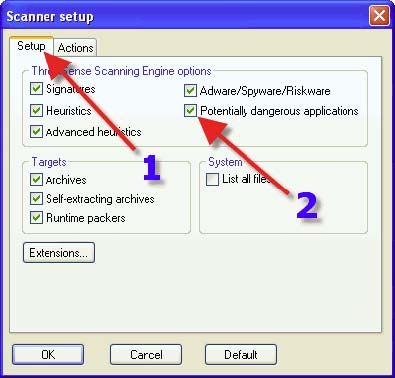
1. Click on the “Setup” tab. 2. Place a check in “Potentially dangerous applications”.
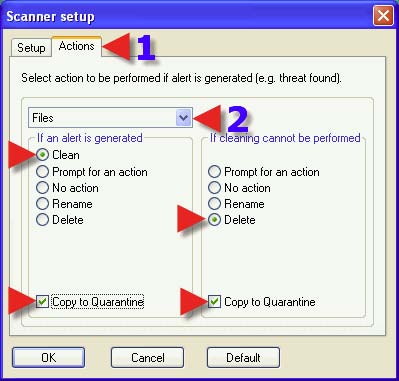
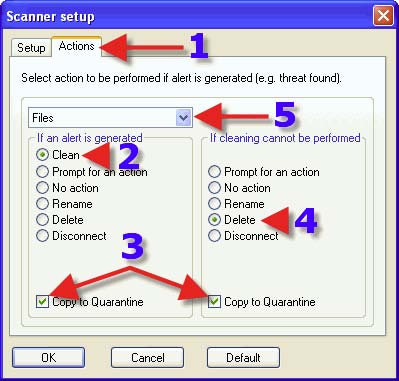
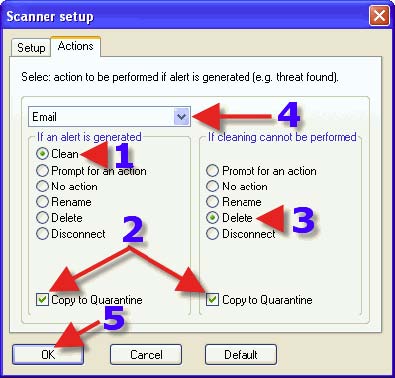
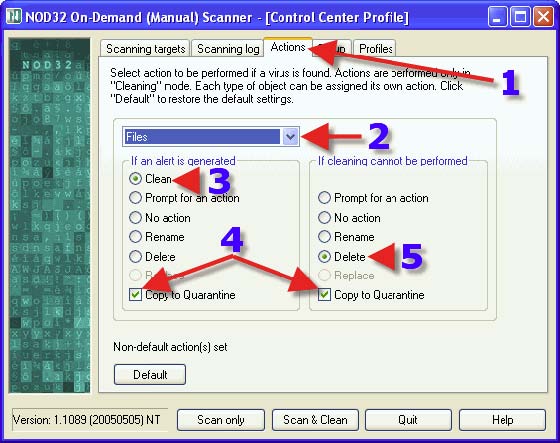
1. Click on the “Actions” tab. 2. Choose a Radio Button that suits one’s needs. If one is new to NOD32 or a novice with a computer, one may want to have NOD32 “Clean” if a virus is found and “Delete” Uncleanable viruses, however, should a scan find a “False Positive” it will delete the file even if it proves to be non-viral at a later date. Though this remains a possibility, it is unlikely for the average user. 3. NOTE: ENSURE Quarantine is checked with EVERYTHING that is detected BEFORE one DELETES anything that is ever found. 4. Choose a Radio Button that suits one’s needs. If one is not sure whether it is safe to delete an infected file, quarantine allows restoration of a file at a later time/date. If a “Probable NewHeur_PE virus found”, please do the following: 1. Place a check in the Quarantine check-box 2. Select Delete 3. Send the quarantined file to Eset: samples@nod32.com Files can be found here: C> Program files> Eset> Infected Note: this folder will only be displayed/made when one first receives an infected file and it is sent to Quarantine. NOTE: Quarantine ONLY copies the Virus or Trojan found so it can be sent to Eset for further analysis, it does NOT isolate the Virus or Trojan. 5. The actions chosen are for specific file types, in this instance “Files”. Clicking on the dropdown arrow reveals the next choice.
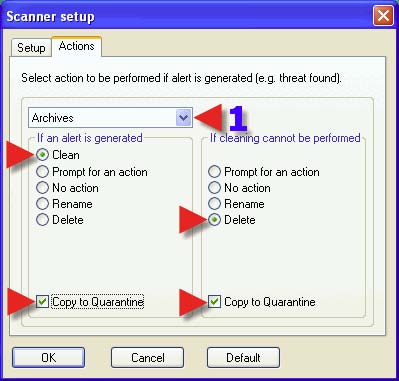
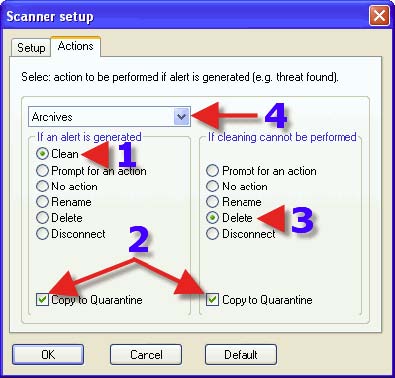
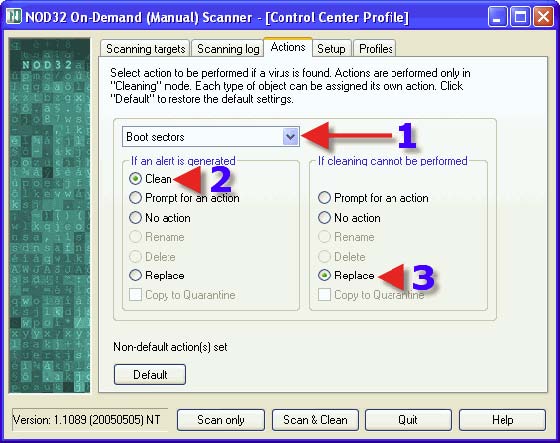
1. Choose a Radio Button that suits one’s needs. The same advice for each choice with 1, 2 and 3 can be found in the section that covers DMON> Actions tab. Clicking on the dropdown arrow reveals the next choice.
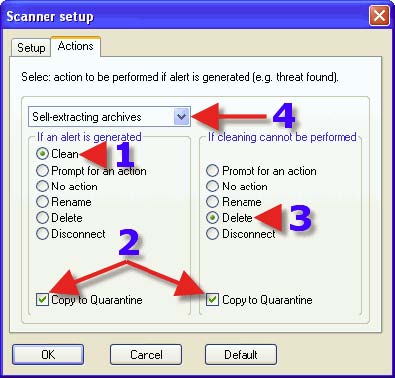
1. Choose a Radio Button that suits one’s needs. The same advice for each choice with 1, 2 and 3 can be found in the section that covers DMON> Actions tab. Clicking on the dropdown arrow reveals the next choice.
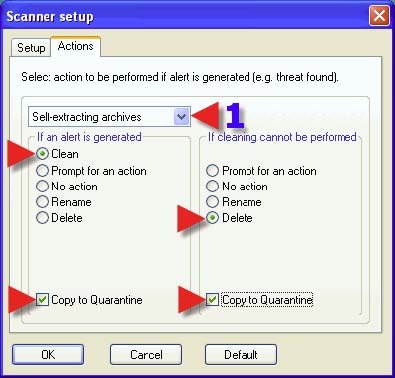
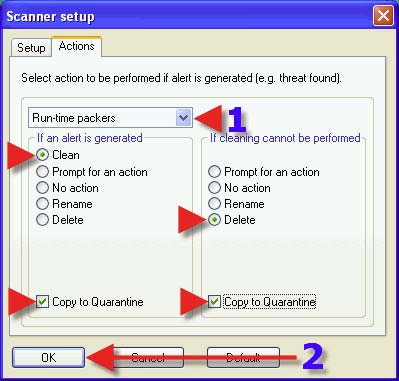
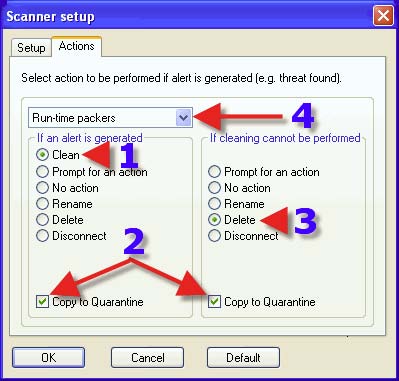
1. Choose a Radio Button that suits one’s needs. The same advice for each choice with 1, 2 and 3 can be found in the section that covers DMON> Actions tab. 5. Click on “OK”.
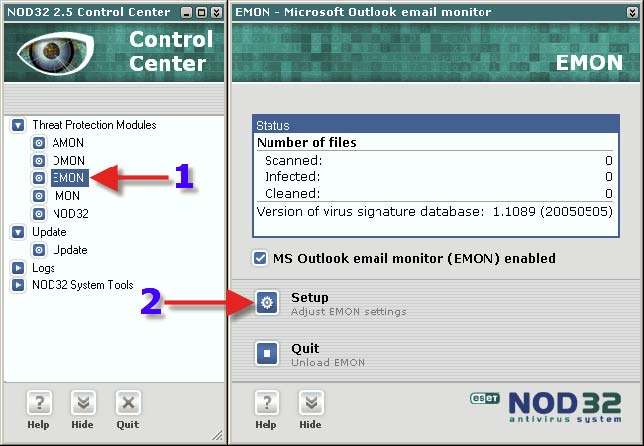
Note: EMON is only used when Microsoft Office is detected. i.e. MS OUTLOOK 2000, 2002, 2003 etc. (not Outlook EXPRESS) 1. Click on “EMON”. 2. Click on “Setup”.
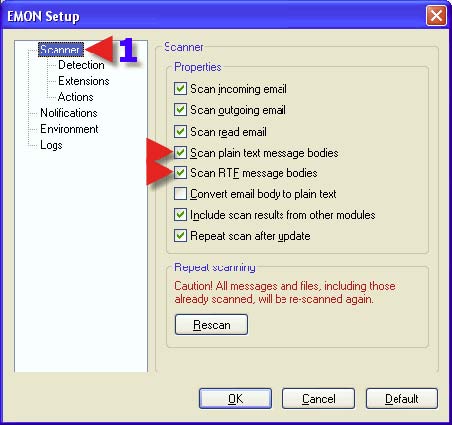
1. Click on “Scanner” 2. Place a check in “Scan plain text message bodies”. I know, but they said the same thing about jpeg files ![]()
![]()
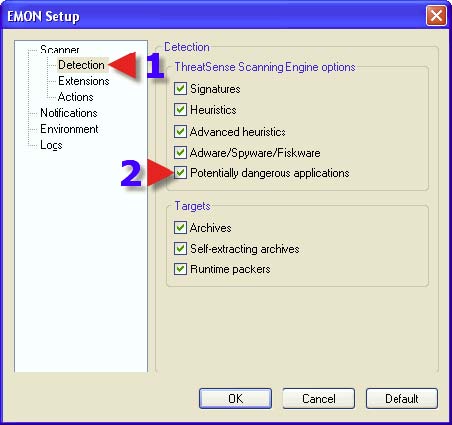
1. Click on “Detection”. 2. Place a check in “Potentially dangerous applications”. WARNING: enabling this option might result in deletion of Remote Adminstrative programs such as those used by network administrators.
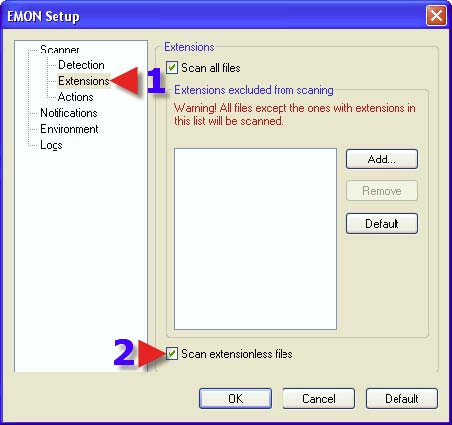
1. Click on “Extensions”. 2. Place a check in “Scan extensionless files”.
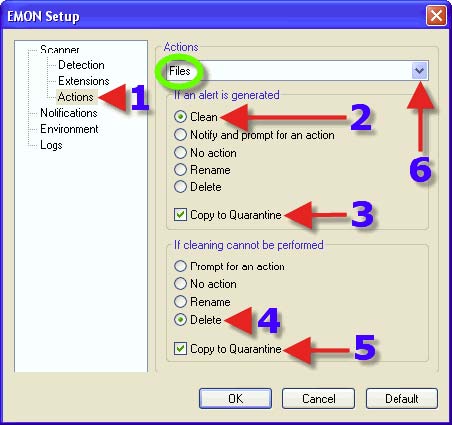
1. Click on the “Actions” tab. 2. Choose a Radio Button that suits one’s needs. The same advice for each choice with 3, 4 and 5 can be found in the section that covers DMON> Actions tab. 6. Clicking on the dropdown arrow reveals the next choice.
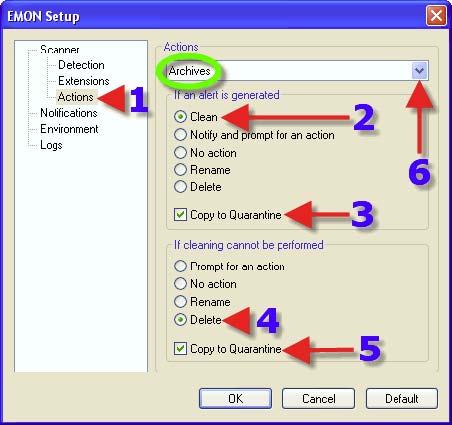
2. Choose a Radio Button that suits one’s needs. The same advice for each choice with 2, 3, 4 and 5 can be found in the section that covers DMON> Actions tab. 6. Clicking on the dropdown arrow reveals the next choice.
2. Choose a Radio Button that suits one’s needs. The same advice for each choice with 2, 3, 4 and 5 can be found in the section that covers DMON> Actions tab. 6. Clicking on the dropdown arrow reveals the next choice.
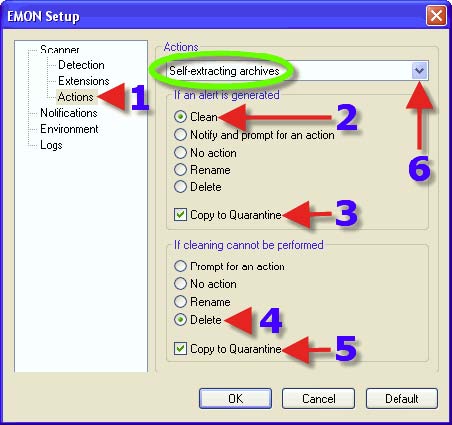
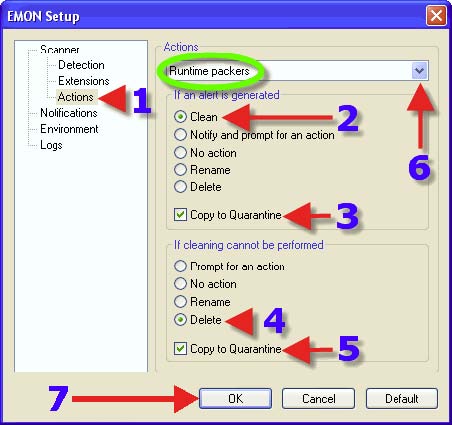
2. Choose a Radio Button that suits one’s needs. The same advice for each choice with 2, 3, 4 and 5 can be found in the section that covers DMON> Actions tab. 7. Click on “OK”.
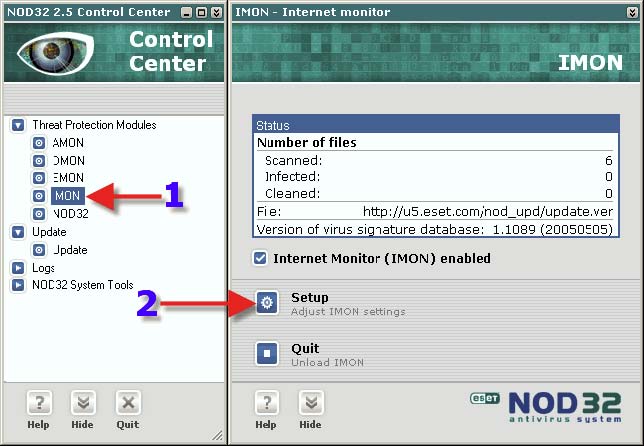
1. Click on “IMON”. 2. Click on “Setup”.
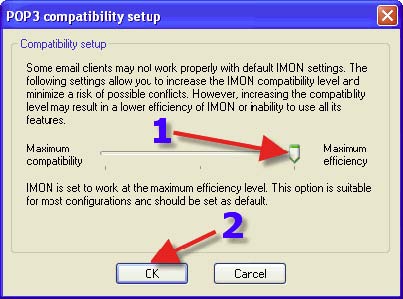
1. Click on the “POP3” tab. 2. Click on “Compatibility Setup” > Setup
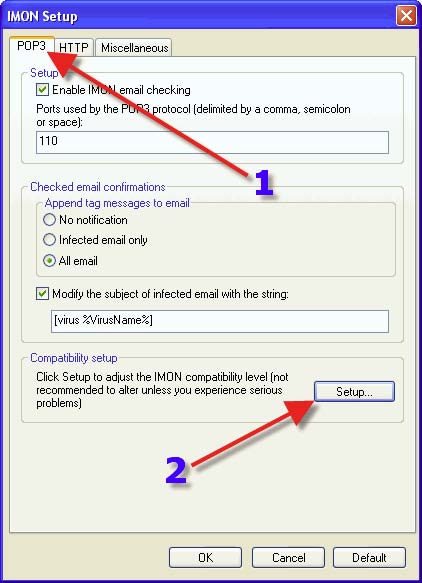
This is also where one will be instructed to go if one is having an issue with IMON.
1. IMON’s compatibility setup can be adjusted by sliding this bar. It is best to leave as is, unless advised otherwise. 2. Click on “OK”.
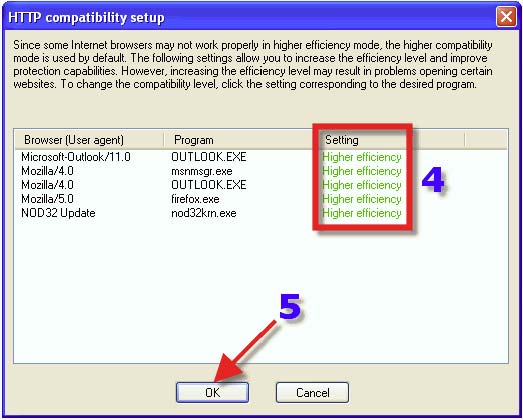
1. Click on the “HTTP” tab. 2. Click on the Radio Button that reads “Automatically deny download of file”. 3. Click on the “Client Compatibility” button. This is where one will be instructed to go if one is having an issue with a particular program.
It is recommended to change the compatibility level to "Higher Efficiency" unless one experiences problems with certain applications. NOTE: With “Higher Compatibility” mode it is possible that Trojans may slip through IMON.

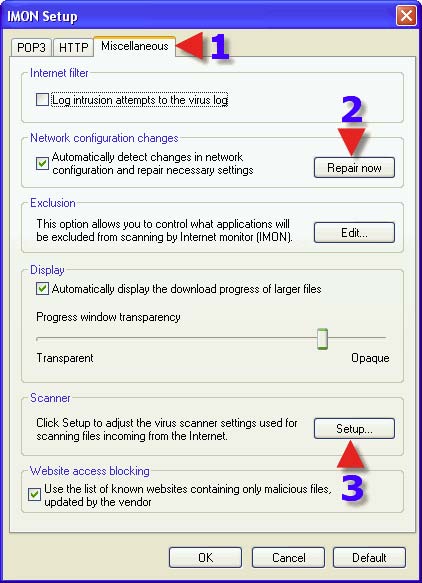
1. Click on the “Miscellaneous” tab. 2. do NOT click this unless you are advised to, or you are seeing a slow internet connection. This button repairs the LSP chain (Winsock). 3. Click on “Scanner> Setup”.
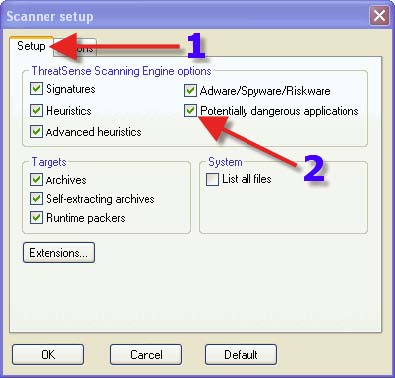
1. Click on the “Setup” tab. 2. Place a check in “Potentially dangerous applications”. WARNING: enabling this option might result in deletion of Remote Adminstrative programs such as those used by network administrators.
1. Click on the “Actions” tab. 2. Choose a Radio Button that suits one’s needs. The same advice for each choice with 2, 3 and 4 can be found in the that covers DMON> Actions tab. 5. Clicking on the dropdown arrow reveals the next choice.
1. Choose a Radio Button that suits one’s needs. The same advice for each choice with 1, 2 and 3 can be found in the post that covers DMON> Actions tab. 4. Clicking on the dropdown arrow reveals the next choice.
1. Choose a Radio Button that suits one’s needs. The same advice for each choice with 1, 2 and 3 can be found in the post that covers DMON> Actions tab. 4. Clicking on the dropdown arrow reveals the next choice.
1. Choose a Radio Button that suits one’s needs. The same advice for each choice with 1, 2 and 3 can be found in the post that covers DMON> Actions tab. 4. Clicking on the dropdown arrow reveals the next choice.
1. Choose a Radio Button that suits one’s needs. The same advice for each choice with 1, 2 and 3 can be found in the post that covers DMON> Actions tab. 4. Clicking on the dropdown arrow reveals the next choice. 5. Click on “OK”.
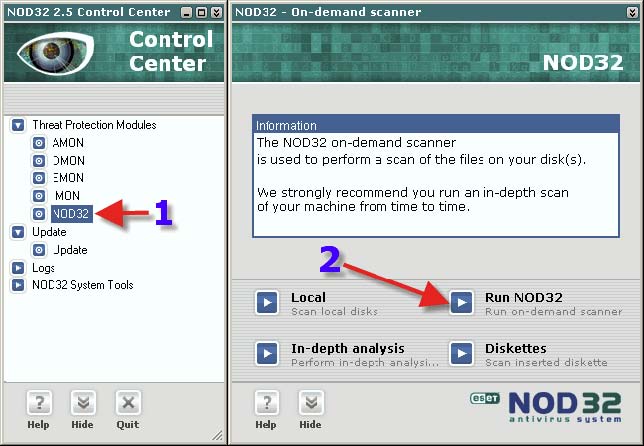
1. Click on “NOD32”. 2. Click on “Run NOD32”.
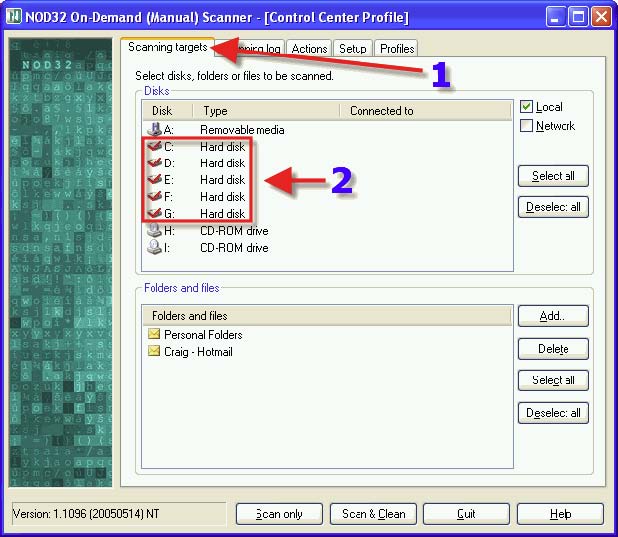
1. Click on the “Scanning Targets” tab. 2. Ensure ALL Hard Drives are checked.
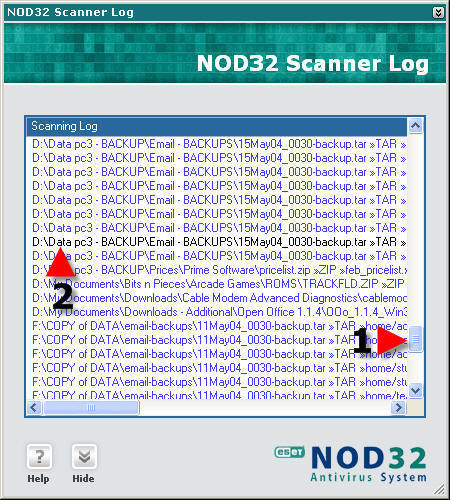
1. Click on the “Scanning log” tab. 2. Place a check in “Scrolling”.

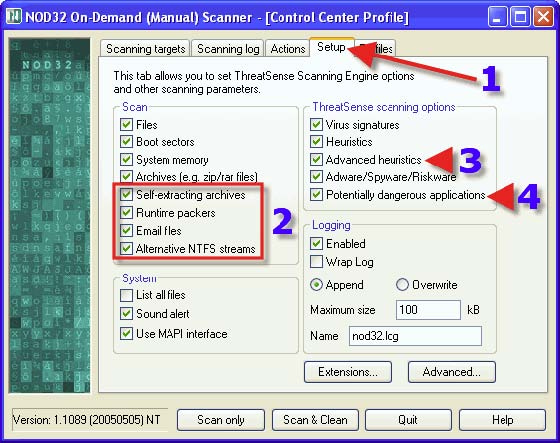
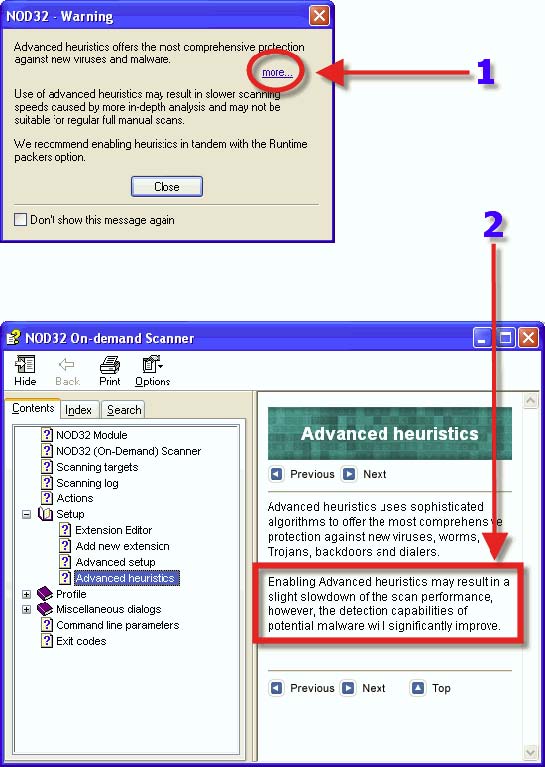
1. Click on the “Setup” tab. 2. Place a check in everything found within “Scan”. 3. Place a check in “Advanced Heuristics”. A warning box will pop up regarding “Advanced Heuristics” and the use thereof, see the next post for further information. 4. Place a check in “Potentially dangerous applications”. WARNING: enabling this option might result in deletion of Remote Adminstrative programs such as those used by network administrators.
1. Click on the “Actions” tab. 3. Choose a Radio Button that suits one’s needs. The same advice for each choice with 3, 4 and 5 can be found in the post that covers DMON> Actions tab. Clicking on 2. will reveal one’s next settings choices.
2. Choose a Radio Button that suits one’s needs. The same advice for each choice with 2 and 3 can be found in the post that covers DMON> Actions tab. Clicking on 1. will reveal one’s next settings choices.
1. Click on “More”. 2. Read enough information to satisfy one’s needs to make an informed choice and then close the popup Window.
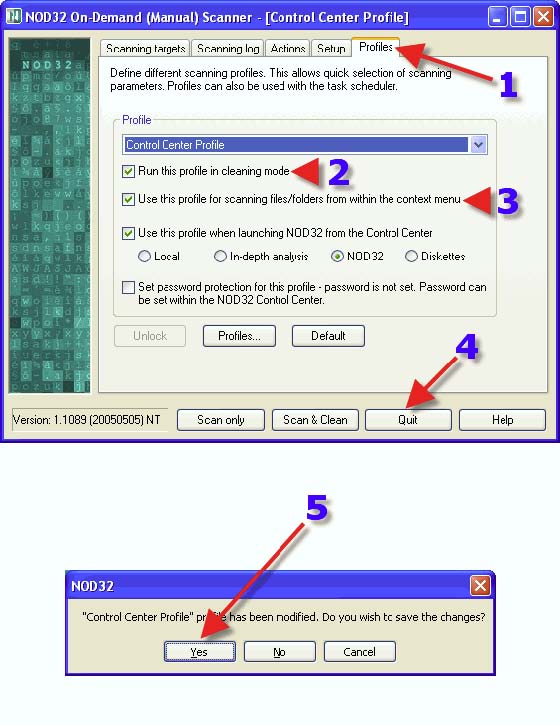
1. Click on the “Profiles” tab. 2. Place a check in “Run this profile in cleaning mode”. 3. Place a check in “Use this profile for scanning files/folders from with the context menu. 4. Click on “Quit”. 5. Save the changes that have been made. Each profile can have different scanning settings if desired, or NOD32 can scan exactly the same way in all profiles. NOD32 is just giving choices, and choices are good. It’s like having many pizzas and on each a different topping can be chosen. Or one favorite topping can be placed on all pizzas.
1. Click on “Update> Update”. 2. Click on “Setup”.
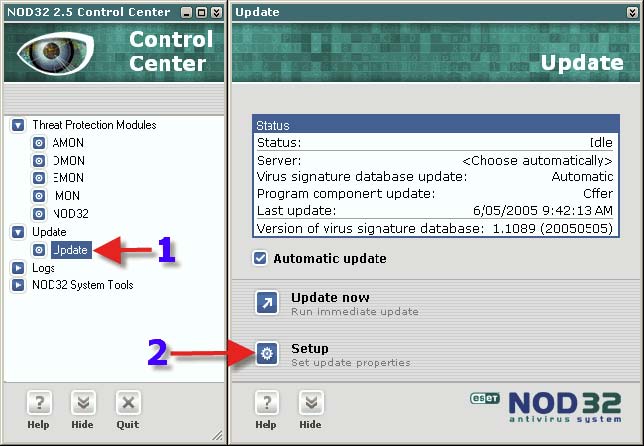
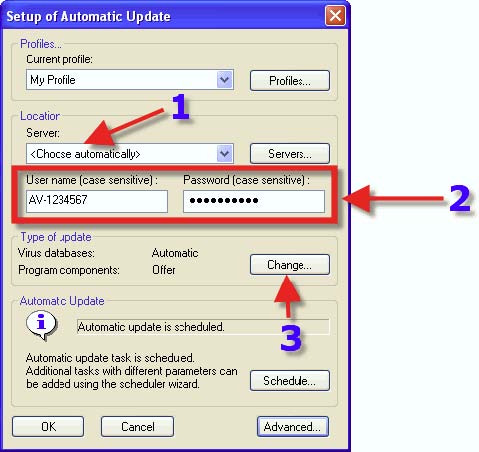
1. Please LEAVE Server as <Choose automatically>, for many reasons: * If a particular server is down, NOD32 will NOT be able to roll on to the next server.
* Experience shows us that one will have fewer or no problems with updating using this setting.
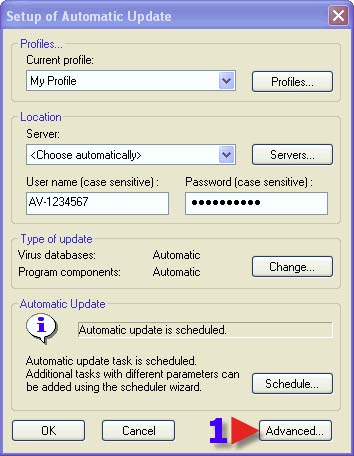
* Let Eset do their job and balance the load on the servers. 2. One’s Username and Password will appear here if one has followed this tutorial from the beginning. Do not try to use a UN and PW that one has created, ONLY a UN and PW provided by Eset will work. 3. Click “Change”.
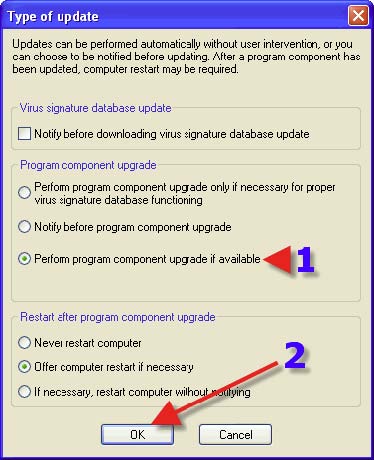
1. It is advised to choose the Radio Button that has NOD32 “Perform program component upgrade if available” and “Offer computer restart if necessary”. NOTE: Due to the size of some program component updates, one may NOT want this setting if on a Dialup Internet Connection. 2. Click on “OK”.
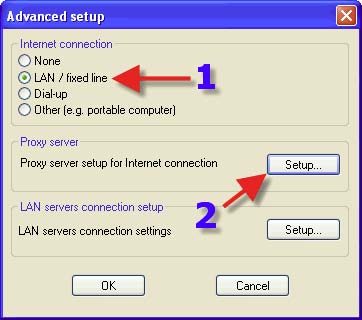
1. Click on “Advanced”.
1. This is where one can set one’s type of connection if NOD32 has not already pre-configured it. 2. Click on Proxy server “Setup”.
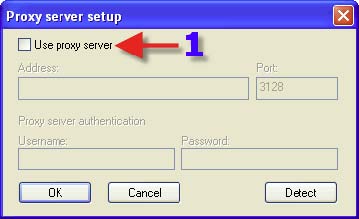
1. This is where Proxy Server settings are placed. Click on “OK” until one is taken back to the next screenshot.
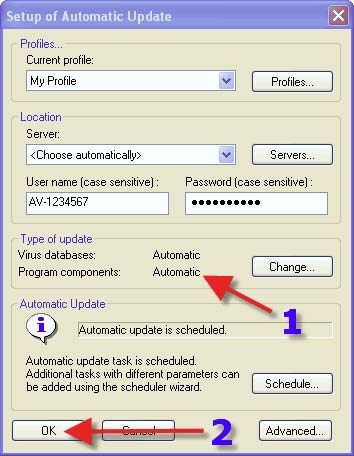
1. One should now see this. 2. Click on “OK”.
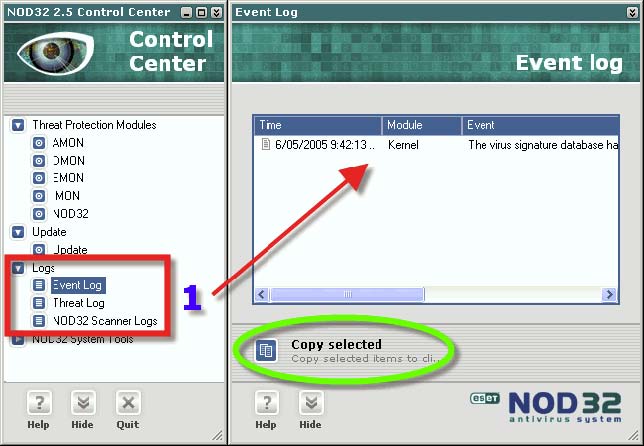
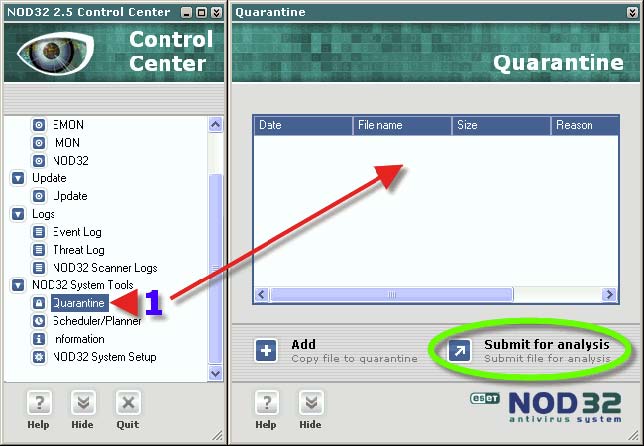
1. Various Log files can be found here. Should one need to, one can click on an entry in the right hand Window, then click on “Copy selected”. One can then paste what has been copied in to Notepad, or MS Word, etc.
1. This is one of the places where Quarantined files can be submitted to Eset. The actual storage folder for Quarantined files can be found in C Drive> Program Files> Eset> Infected
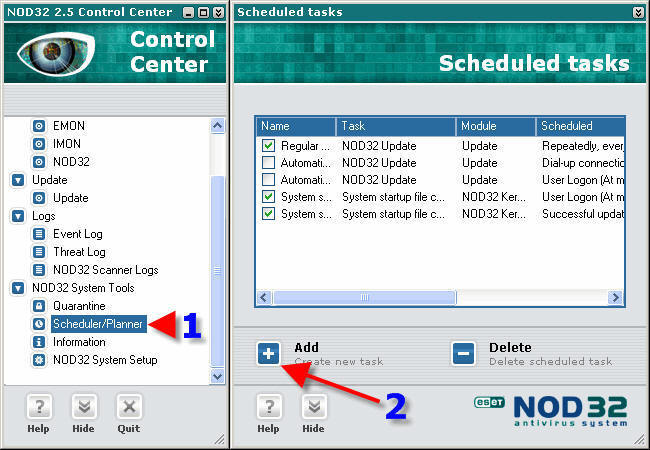
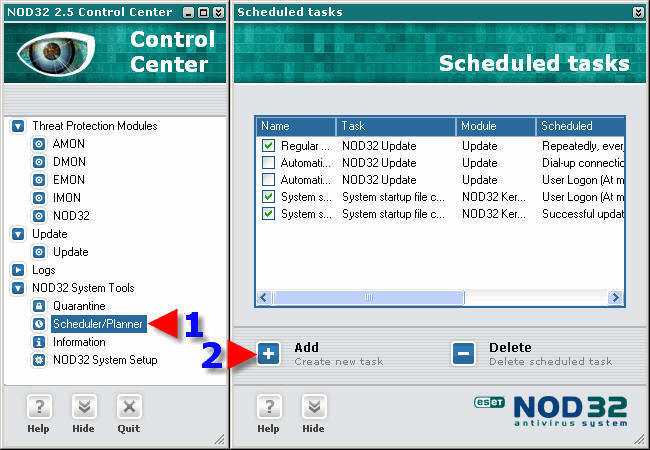
SCHEDULER / PLANNER Back to Top
NOTE: Adding a scheduled task and choosing one that has been configured with “Run this profile in cleaning mode” enabled will be a silent task (i.e. no user interaction or visible signs of the task being run except through the NOD32 Scanner Logs and the Hard Drive light flashing ☺ )
1. Click on “Scheduler/Planner”. 2. Click on “Add”.
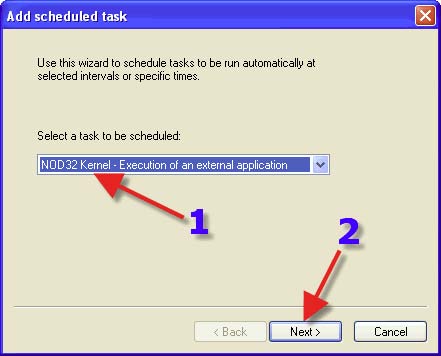
1. In the dropdown box, choose “NOD32 Kernel – Execution of an external application”. 2. Click on “Next”.
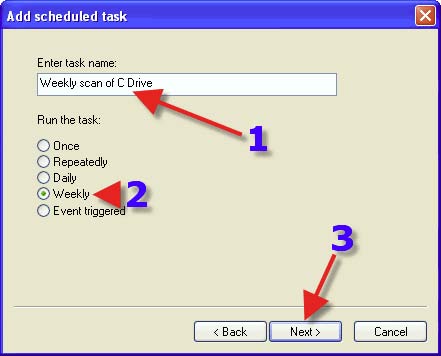
1. Choose a name for your task. 2. Choose a Radio Button that suits your needs. 3. Click on “Next”.
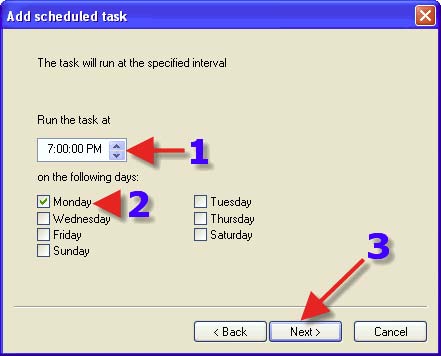
1. Choose a time to run your task. 2. Place a tick in a day or days that you want to run your task. 3. Click on “Next”.
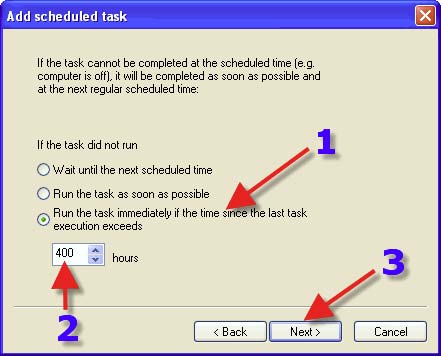
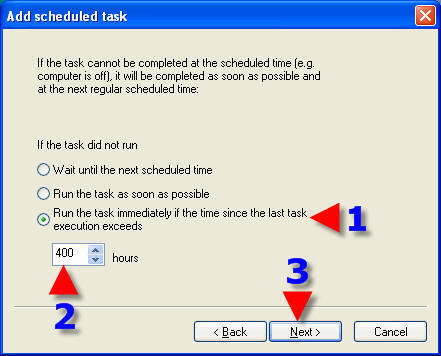
1. Choose a Radio Button that suits one’s requirements. 2. This will prevent overlaps of a Scheduled Task if one chooses the Radio Button in the screenshot. 3. Click on “Next”.
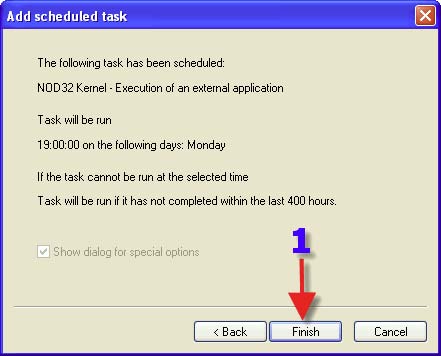
1. Click on the “Finish” button.
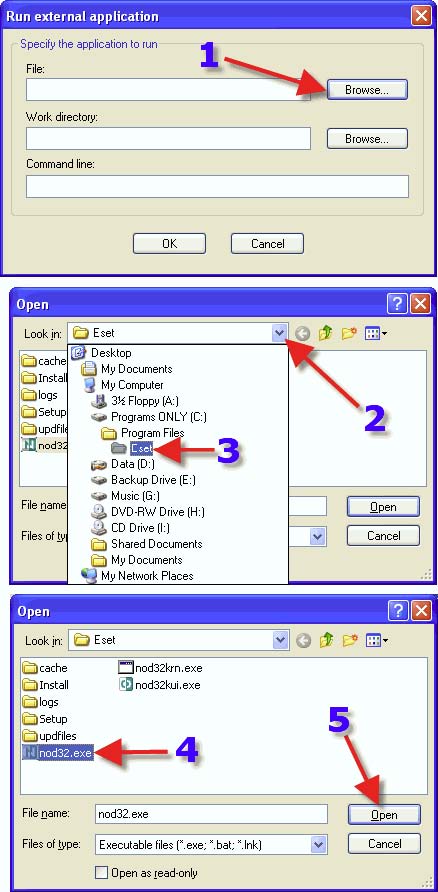
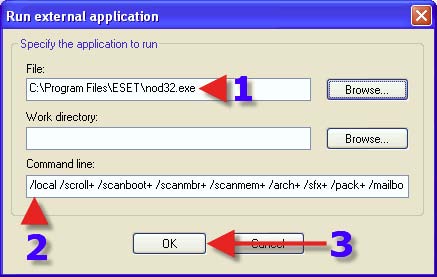
1. Click on “Browse”. 2. Browse to where NOD32 is installed, typically where you see in this screenshot. 3. Click on the Eset folder. 4. Click on “NOD32.exe”. 5. Click on “Open”.
1. This is what should be seen.
2. Place in the “Command line” all appropriate “Switches” that suit your requirements. In this screenshot you will see that I am using /local this will scan all of my drives.
3. Click on “OK”. Here are the switches that should give the greatest and maximum strength scan: /adware /ah /all /arch+ /clean /cleanmode /delete /heur+ /log+ /mailbox+ /pack+ /quarantine /quit+ /scanboot+ /scanmbr+ /scanmem+ /scroll+ /sfx+ /unsafe /wrap+
Your scan settings will start with: C:\ (single space) /switches go here - see screenshot Or Copy and Paste the following directly into the settings: C:\ /adware /ah /all /arch+ /clean /cleanmode /delete /heur+ /log+ /mailbox+ /pack+ /quarantine /quit+ /scanboot+ /scanmbr+ /scanmem+ /scroll+ /sfx+ /unsafe /wrap+ Or To scan ALL of the drives do NOT use C:\ use ONLY the following: /local /adware /ah /all /arch+ /clean /cleanmode /delete /heur+ /log+ /mailbox+ /pack+ /quarantine /quit+ /scanboot+ /scanmbr+ /scanmem+ /scroll+ /sfx+ /unsafe /wrap+
/local = Scan all local drives
/adware = Enable detection of adware, spyware and riskware
/ah = Enable advanced heuristics
/all = Scan all files regardless of their extension
/arch+ = Enable archives (ZIP, ARJ and RAR) scanning
/clean = Clean infected objects (if applicable)
/cleanmode = Enables cleaning mode (the actions taken will depend on the action settings) /
delete = Delete the infected file
/heur+ = Enable standard heuristics
/log+ = Enable Log file generation
/mailbox+ = Enable scanning mailboxes
/pack+ = Enable internal runtime packer files scanning
/quarantine Copy infected file to quarantine before taking further action (clean/delete)
/quit+ = Quit the program after scanning
/scanboot+ = Enable boot sectors scanning
/scanmbr+ = Enable MBS scanning
/scanmem+ = Enable scanning memory
/scroll+ = Enable scrolling of the Log /
sfx+ = Enable scanning self-extracting archives
/unsafe = Enable detection of potentially dangerous applications
/wrap+ = Enable text wrapping in the Log file
When running the scanner from the command line, a number of parameters and switches can be used to specify the various options.
The parameters and their effects:
Many parameters are enabled or disabled with a plus(+) or minus (-) sign. For example, to enable the scanner self-check use “/selfcheck+” , to disable it, use “/selfcheck-”.
General
- /help Display the list of program switches
- /selfcheck+ (-) Self-test enable (disable)
- /expire+ (-) Enable (disable) the program expiration notice
- /subdir+ (-) Enable (disable) the sub-directories scanning
- /sound+ (-) Sound warning enable (disable)
- /list+ Create the list of all tested objects in the Log
- /list- Include in the Log only the objects infected
- /break+ (-) Enable (disable) testing intermission
- /scroll+ (-) Enable (disable) Log scrolling
- /quit+ (-) Quit/do not quit the program after scanning
Detection
- /pattern+ (-) Enable (disable) testing using virus signatures
- /heur+ (-) Enable (disable) heuristic analysis
- /scanfile+ (-) Enable (disable) scanning of files
- /scanboot+ (-) Enable (disable) boot sector scanning
- /scanmbr+ (-) Enable (disable) master boot record (MBR) scanning
- /scanmem+ (-) Enable (disable) scanning memory
- /arch+ (-) Enable (disable) scanning archives (ZIP, ARJ and RAR)
- /sfx + (-) Enable (disable) scanning self-extracting archives
- /pack+ (-) Enable (disable) scanning runtime-packed files internally
- /mailbox+ (-) Enable (disable) scanning mailboxes
- /adware Enable detection of adware, spyware and riskware
- /unsafe Enable detection of potentially dangerous applications
- /local Scan all local non-removable media
- /network Scan all network disks
- /ext=<LIST> Add a new extension to the list of scanned files. (multiple entries are permitted, e.g., /ext=EXT1,EXT2)
- /exclude=<LIST> Excludes a single particular file from scanning, multiple files can be selected using wildcards
- /all Scan all files
Heuristic analysis
- /ah Enable advanced heuristics
- /heur+ (-) Enable (disable) standard heuristics
Log
- /log+ (-) Enable (disable) log file creation
- /wrap+ (-) Enable (disable) wrapping text in log
- /logappend Enable (disable) appending to log file
- /logrewrite Enable rewriting of the Log file
- /logsize=N Set Log file to a maximum size of N KB)
- /log=<FILENAME> Set the Log file name (e.g.: /log=NOD.LOG)
Cleaning
- /cleanmode Enables cleaning mode (the actions taken will depend on the action settings)
- /clean Clean infected objects (if applicable)
- /prompt Prompt for an action when a virus is detected
- /rename Rename infected files
- /delete Delete infected files
- /quarantine Copy infected file to quarantine before taking further action (clean/delete)
![]() Note: If the switches: /prompt, /rename, /delete/ or /replace are used concurrently with the /clean switch, the corresponding action will be carried out only if the virus cannot be cleaned. The further a parameter is listed, the higher priority it has. For instance, using the "/clean /delete /prompt " parameters will result in that the "/prompt " parameter will supersede the "/clean /delete" parameters.
Note: If the switches: /prompt, /rename, /delete/ or /replace are used concurrently with the /clean switch, the corresponding action will be carried out only if the virus cannot be cleaned. The further a parameter is listed, the higher priority it has. For instance, using the "/clean /delete /prompt " parameters will result in that the "/prompt " parameter will supersede the "/clean /delete" parameters.
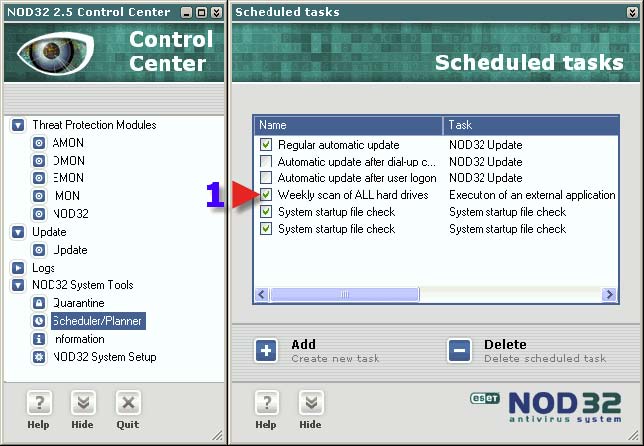
1. The “Scheduled scan” just set up will now appear here.
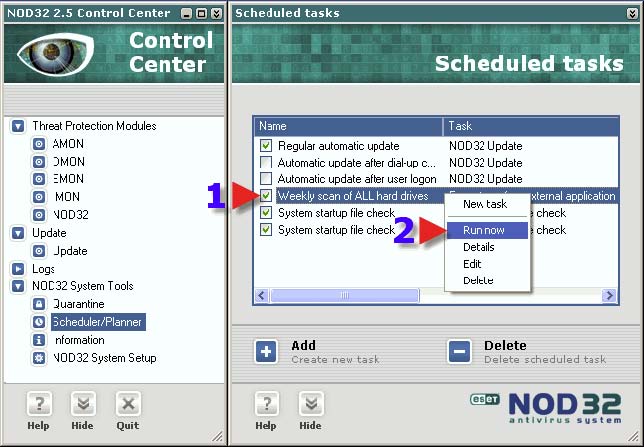
1. Right Click on the new scheduled scan. This will pop up a small window as seen in the screenshot. 2. Click on “Run now”. If the settings are correct, the next screenshot is shown when the scan starts.
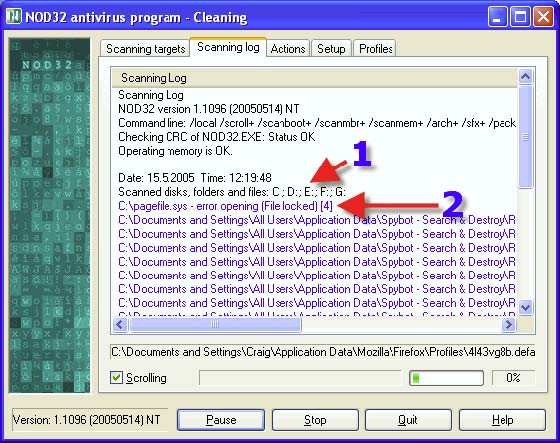
1. Using /local shows all local drives that are in the process of being scanned.
2. [4]Locked Files are password protected or Windows System Swap Files, and as such are locked by the Operating System and it is unlikely they will be infected.
WINSOCK REPAIR
If you find that your internet connection has been broken, please run Winsock XP Fix.
OR
Proceed with the following to delete the corrupted registry keys, and then reinstall the TCP/IP protocol.
Step 1. Delete the corrupted registry keys
1. Click Start, and then click Run.
2. In the Open box, type regedit, and then click OK.
3. In Registry Editor, locate the following keys, right-click each key, and then click Delete:
HKEY_LOCAL_MACHINE\System\CurrentControlSet\Services\Winsock
HKEY_LOCAL_MACHINE\System\CurrentControlSet\Services\Winsock2
4. When you are prompted to confirm the deletion, click Yes.
NOTE: Restart the computer after deleting the Winsock keys. Doing so causes the Windows XP operating system to create new shell entries for those two keys. If one does not restart the computer after deleting the Winsock keys, the next step does not work correctly.
Step 2. Install TCP/IP
1. Right-click the network connection, and then click Properties.
2. Click Install.
3. Click Protocol, and then click Add.
4. Click Have Disk.
5. Type C:\Windows\inf, and then click OK.
6. On the list of available protocols, click Internet Protocol (TCP/IP), and then click OK.
7. Restart the computer.
TOTALLY SILENT SCAN Back to Top
This scan can be very useful on a multi-user computer where a person/persons are prone to closing/stopping visibly run scans.
1. Click on “Scheduler/Planner”.
2. Click on “Add”.
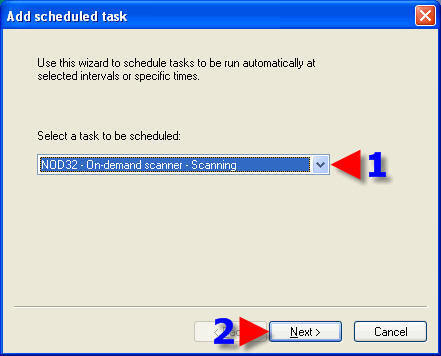
1. In the dropdown box, choose “NOD32 – On demand scanner - Scanning”.
2. Click on “Next”.
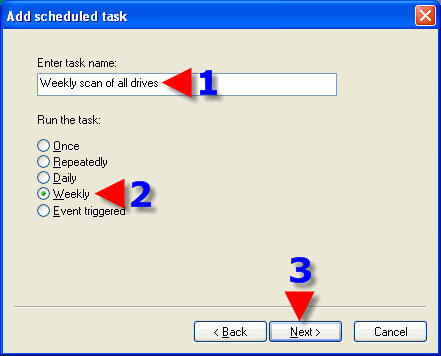
1. Choose a task name.
2. Choose a Radio Button that suits ones needs.
3. Click on “Next”.
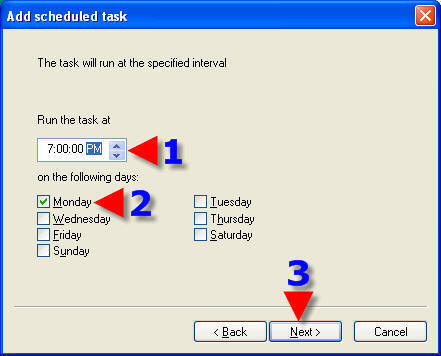
1. Choose a time to run your task.
2. Place a check in a day or days that you want to run your task.
3. Click on “Next”.
1. Choose a Radio Button that suits your requirements.
2. This will prevent overlaps of a Scheduled Task if you choose the Radio Button in the screenshot.
3. Click on “Next”.
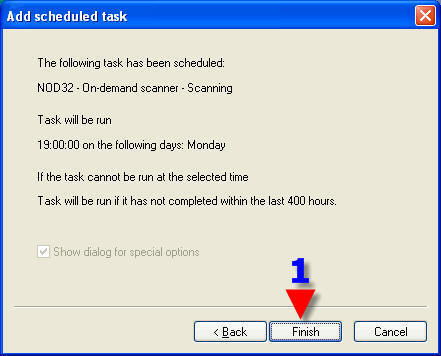
1. Click on the “Finish” button.
1. In the dropdown box, choose “Control Center Profile”.
2. Click on “OK”.

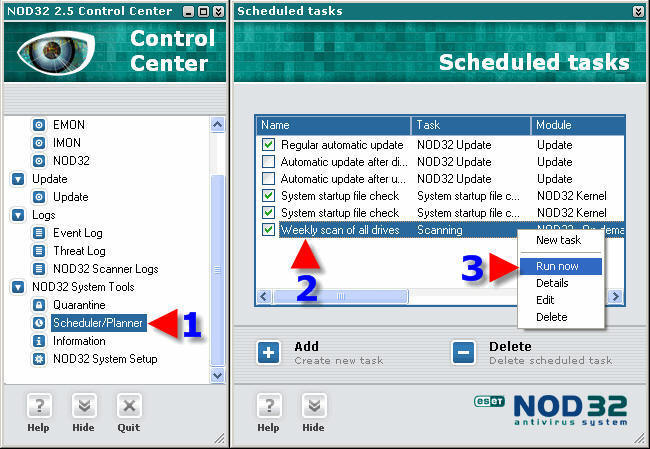
1. Remain in the Scheduler/Planner module.
2. Right Click on your new scheduled scan. This will pop up a small window as seen in the screenshot.
2. Click on “Run now”.
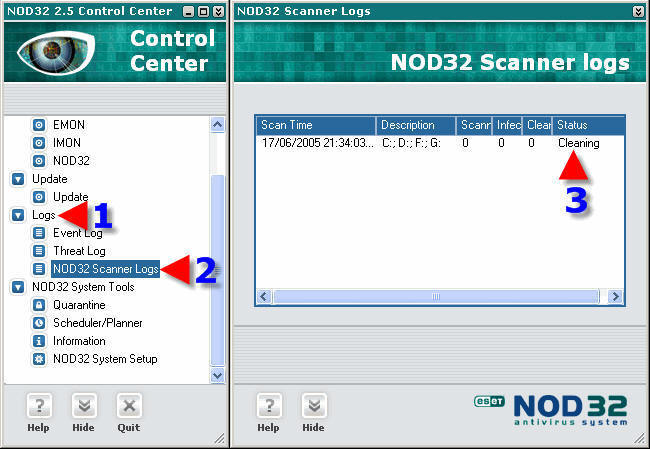
1. Click on “Logs”.
2. Click on “NOD32 Scanner Logs”.
3. If your settings are correct you will see “Cleaning” as the scan starts.
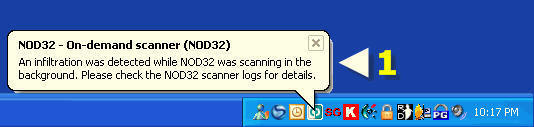
1. If an infiltration (Virus, Trojan etc) is found, at the end of the scan you will see a popup window (if silent mode is not turned on).
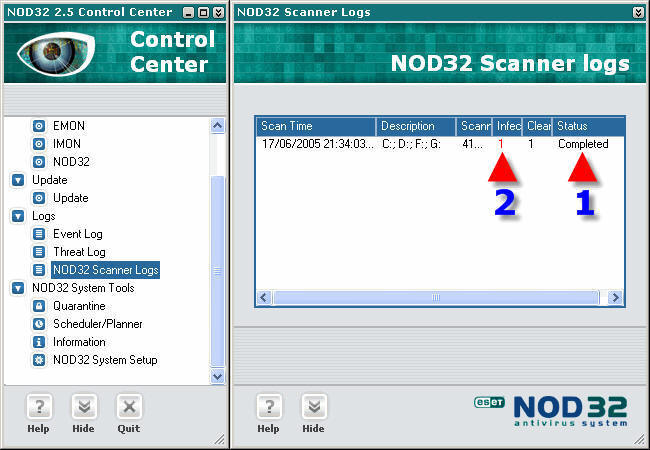
To view details of a scan go to the Control Center> Logs> NOD32 Scanner Logs.
1. You will see the scan has “Completed”.
2. In this case an infection was detected (as referenced in the previous screenshot).
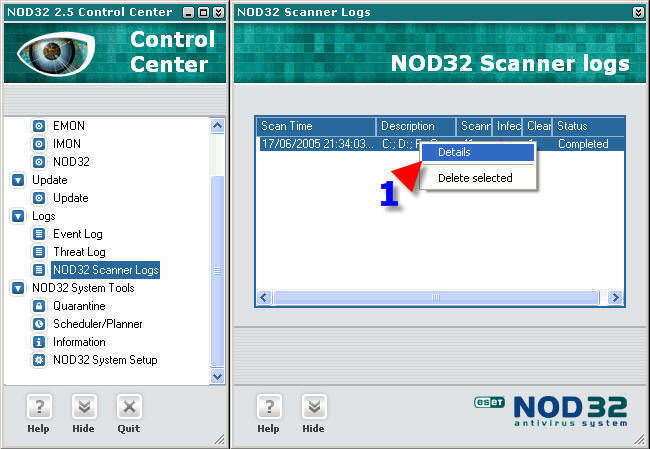
1. Right click on the log that you would like to view, select and click on “Details”.
1. Draw the slider down to see the results and locate the infection.
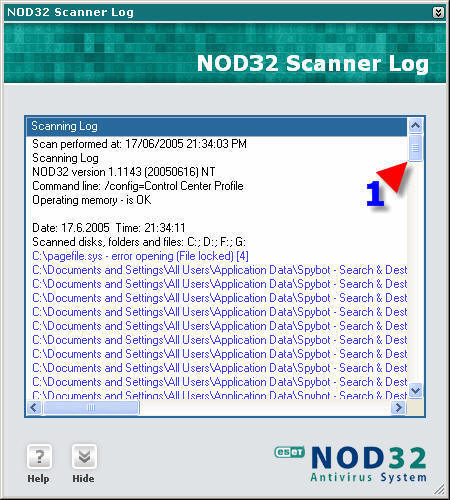
1. Having drawn the slider down you can see the infection displayed in a different color to the rest of the details logged.
2. The Infection.